

Google Photos ships on every Android smartphone by default. It is a great app for viewing photos and videos as well as taking a backup when you decide to delete the original photos to free up local storage. However, if you have been using Google Photos for a long time, no doubt you might’ve amassed a humongous library of photos and videos.
One such common occurrence that fills any photo library (including Google Photos) is of duplicate and similar-looking shots. Luckily, Google Photos now has features to organize such photos as well as manipulate them. Dubbed as ‘Photo Stacks’, this is a great Google Photos organization tool that can help you keep your photo library neat and tidy by getting rid of all duplicate shots.
Just because I said it, doesn’t mean you must’ve got it, right? Let’s see what Photo Stacks are and how you can use them to manipulate and organize your photo library with ease.
What are Photo Stacks on Google Photos?
Your phone has a burst mode that captures photos in quick succession. You can use the mode for GIF or simply to get more photos that you can choose from later. Other times, we usually click several photos of the same scene or subject to ensure we get the perfect shot when it’s time to view or use that particular image.
However, we usually forget to delete those additional shots that eventually end up cluttering both the phone’s gallery as well as Google Photos. With Photo Stacks, you can stack duplicate or similar shots that should help you keep the gallery organized. It doesn’t get rid of duplicate photos (unless you ask for it) but rather puts all the similar shots behind each other so that you can only view one image in the album followed by the ‘stack’ icon to view other shots.
How To Enable Photo Stacks in Google Photos?
#1: First up, open Google Photos (of course).
#2: Look out for three vertical dots located on the right side of the app between the highlight carousel and the last photo. Tap on it to view options.
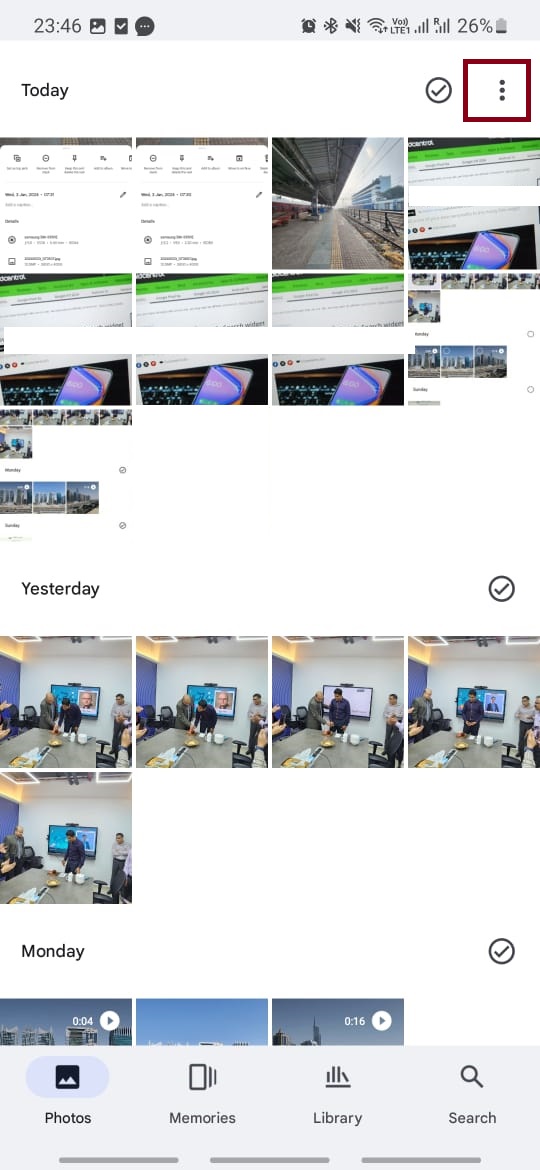
#3: Click on “Stack Similar Photos” to toggle and enable it.
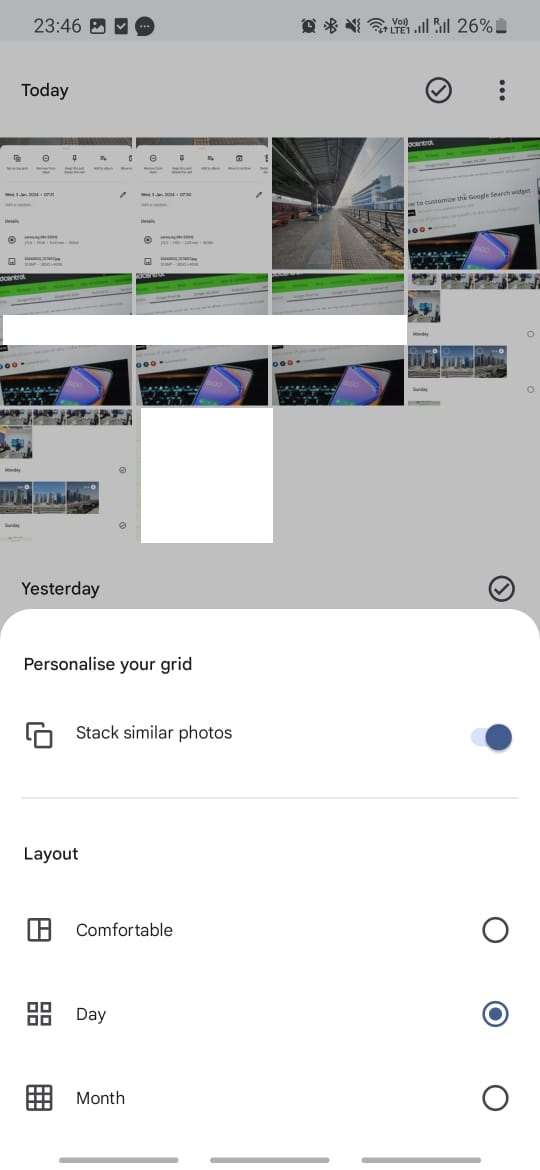
When you get out of this menu, you should see a small ‘stacked’ icon on top of photos that have duplicate or similar shots with the number count. Here. ‘2’ denotes two photos and so on.
Note: Apparently, the feature only works on photos that are backed up on the cloud. Thus, if you don’t have some of the photos backed up, you won’t see stacked photos on these shots. Also, it will take some time before Photo Stacks start to show up.
ALSO SEE: 100X Zoom Camera Mobile Phones in India 2024
How To Manipulate Photo Stacks in Google Photos?
Now that you have enabled Photo Stacks in Google Photos and it is activated, how do you manipulate it? In fact, what can you do with the feature enabled? Let’s see the various options available.
Stack ‘em
You can stack duplicate or similar-looking shots by selecting a photo for a bit and then, drag it on similar photos to stack it up. Google Photos understands what similar shots look like and automatically picks these shots to stack. [May not work always although the previous method on how to enable works fine].
View ‘em
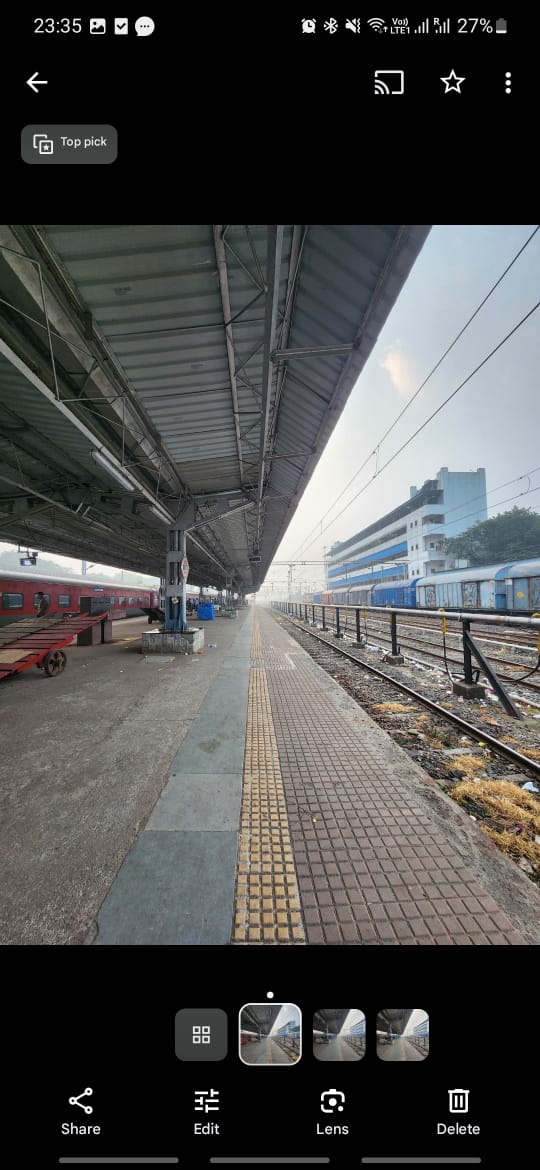
Next up, how to view each shot since you can only see one i.e. Top Pick. For this, you need to tap on the stack to view the photo. At the bottom just above ‘Share’, ‘Edit’ and other options, you should see the thumbnail of all the similar shots that you can select and view enlarged. Alternatively, click on the first icon (with four squares) as seen in the pic below which should show all the photos in a larger size altogether.
Selecting Top Pick

You might have similar shots but you want to see only one as the ‘top pick’. What to do? Turns out Photo Stacks have features to select the best of the lot. Simply view the photo you want to pick, click on three vertically stacked dots located in the top-right corner, and select ‘Set as top pick’.
ALSO SEE: 13mm Driver Earbuds Price List in India 2024
Delete the rest of ‘em
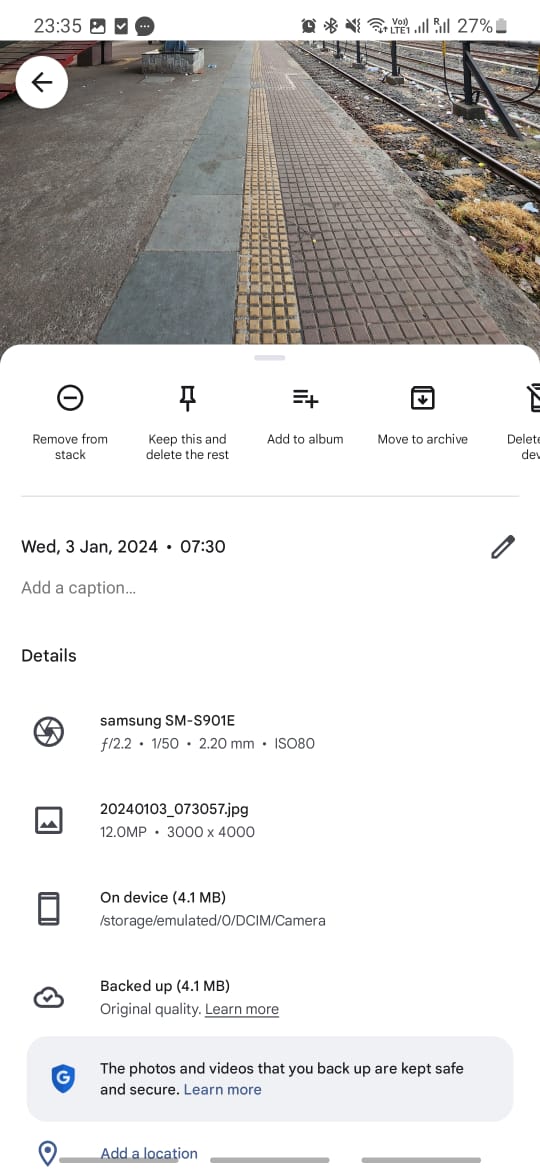
Consider this – you have a stack of four photos and you want to select all but keep one. Albeit you can manually delete them, it becomes a task if there are many shots in the stack. Here’s the easy way to do it.
#1: View the photo on Photo Stacks that you want to keep.
#2: Click on three vertically stacked dots on the top-right corner.
#3: Tap on ‘Keep this and delete the rest’ and you guessed it, it will delete the rest.
ALSO SEE: Gaming Headphones Price List in India 2024
How To Declutter Your Gallery with Photos Stack?
You can declutter your gallery with Photos Stack. Since you can easily stack similar and duplicate shots, it declutters your gallery as you can simply choose whether you keep the stack or delete except the best one of the lot. Moreover, Google Photos offers a bunch of features including Photo Unblur, Magic Eraser, and Portrait Light among others that you should be able to hone to get the best of the cloud storage Google offers with free accounts.
Decluttering the app by deleting duplicate shots would help you free precious cloud storage that can be used to keep useful data.
You can follow Smartprix on Twitter, Facebook, Instagram, and Google News. Visit smartprix.com for the most recent tech and auto news, reviews, and guides